Setting Up Your Development Environment
In order to get moving with Instant Answer development, you'll need to setup your environment. There are three main steps:
- Fork the appropriate repository on Github.com
- Set Up the DuckDuckGo environment on Codio.com
- Clone your Github fork onto the Codio environment
We've broken these down step-by-step below. If you prefer, you can also watch a video screencast of this tutorial.
1. Fork the appropriate repository on Github.com
1a. Sign Up for Github.com
Already have a GitHub Account? Perfect, move to the next step.
Git is a tool that allows many people to collaborate on one codebase. GitHub is a popular site for groups to host Git repositories. If this is your first time using Git and GitHub, we've created an overview of how you'll use Git to contribute to DuckDuckHack.
To get started, let's sign up for GitHub:
- Go to https://github.com/join and enter the required information, then click "Create an Account"
- Click "Finish Signup" to continue with a Free GitHub account.
1b. Create a Fork
Let's obtain the latest copy of the open-source code powering all Instant Answers. We're going to "fork" that code, so you'll have your own personal copy which you can modify and test without affecting the original.
The two main repositories are Goodies and Spice. There's no particular reason to divide it this way, except that Goodies don't make external requests, and Spice Instant Answers do.
Make sure you are logged in to Github.com as yourself
Go to the corresponding Instant Answer repository homepage:
Click "Fork", near the top-right corner.
Wait while the repo forks...
You should see a page that looks nearly identical to the repo home page you were just on. The URL should be different though, it should look like
https://github.com/yourGitHubUsername/zeroclickinfo-xxxxx.This is the URL for your personal fork of the DuckDuckHack code. Keep it handy, we'll be using it in a minute!
2. Set Up the DuckDuckGo Environment on Codio.com
Before we work on the Instant Answer codebase, we first need a development machine that can run and test these files. We'll use Codio to set this up super quickly and conveniently.
Codio is the best and most popular option among contributors. If you need to develop locally, we have alternate development environments available.
2a. Sign Up for a Codio Account
Already have a Codio Account? Perfect, move on to the next step!
- Go to https://codio.com and click "Get Started", at the top right corner.
- Click "Sign Up via GitHub".
- If you aren't already signed into GitHub, enter your GitHub login details and then click "Sign In".
- Click "Authorize application" to continue.
- In the new screen, enter the required details and click "Create Account".
2b. Join the DuckDuckGo Organization on Codio
After logging into Codio, click this link and you'll be added to our organization, which gives you a professional Codio setup free of charge.
You should see a confirmation message at the bottom of your Codio screen after clicking.
2c. Create a Copy of the DuckDuckGo Environment
In this step we'll setup our virtual development computer with all the convenient development tools pre-installed. We've already created this for you on Codio, and all you need to do is make a copy for yourself.
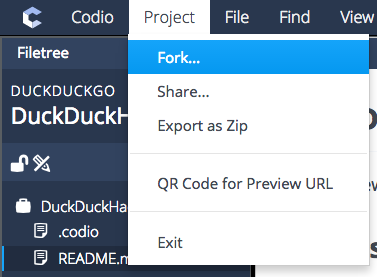
Go to https://codio.com/duckduckgo/duckduckhack and click "Project" at the top left corner.
In the drop-down, select the "Fork" option.
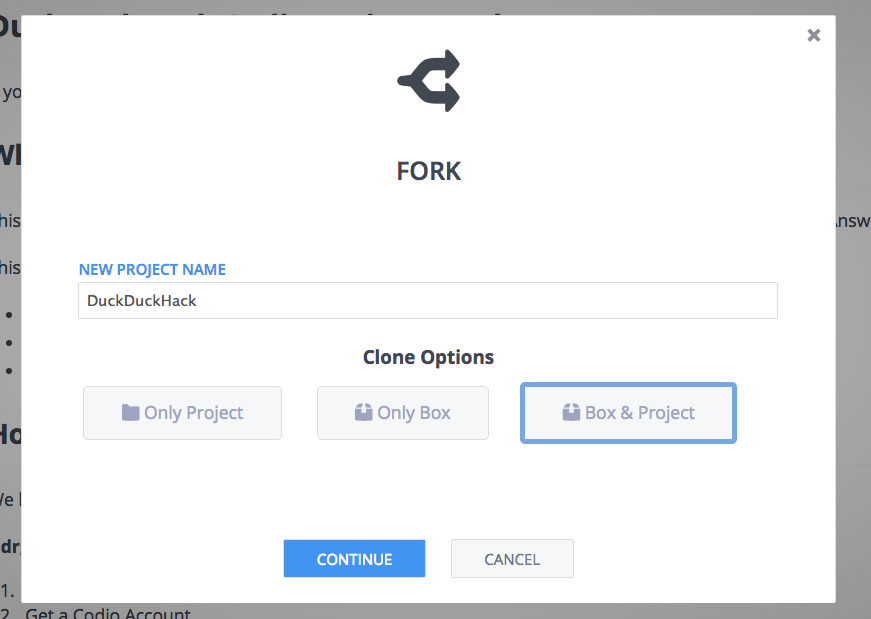
In the pop-up window, select the "Box & Project" option and click "Continue".
Wait a minute while the environment copies...
You should now see a new window with three panes. It should say "DuckDuckHack" at the top of the left pane.
Good work! You now have your own machine on Codio with all the DuckDuckHack development tools installed. You'll learn more about these tools in the tutorials.
3. Clone Your Github Fork onto the Codio Environment
Now we'll put it all together - we'll bring the code we forked on Github onto the environment we set up. This is called cloning a repository.
3a. Load Your Codio Environment
If you're already in Codio from the previous section - excellent! Skip to the next step.
Go to the Codio projects page.
- See a "Sign In" screen? Use the "Sign in via GitHub" method like you did before (see Step #2 here).
Click the "DuckDuckHack" project.
You should now see the three-pane window we previously saw.
Tip: Press Ctrl+Alt+R (Cmd+Alt+R on a Mac), this will improve the layout a bit. (You can also click View->Layouts->Default from the command bar at the top).
3b. Clone the Code
Open the Terminal. You can do this by clicking Tools->Terminal from the menu, or pressing Shift+Alt+T. You should see the right side pane change into a black command prompt.
Type
git clone <Your GitHub URL Here>.gitinto the Terminal, replacing<Your GitHub URL Here>accordingly. It should look something like this for a Goodie:[codio@buffalo-pixel workspace]$ git clone https://github.com/githubusername/zeroclickinfo-goodies.gitEnter your Github credentials as prompted.
If your Github password doesn't work, you may need to enter a Personal Access Token as your password instead. Simply copy and paste your token from your Github Settings when prompted for your password. (This happens if you have set up Github's Two-Factor Authentication feature.)
Press "Enter". You should see the Terminal print out some text that looks like this:
 [codio@buffalo-pixel workspace]$ git clone https://github.com/githubusername/zeroclickinfo-goodies.git
 Cloning into 'zeroclickinfo-goodies'...
 remote: Counting objects: 18623, done.
 remote: Compressing objects: 100% (8083/8083), done.
 remote: Total 18623 (delta 8084), reused 18179 (delta 7868)
 Receiving objects: 100% (18623/18623), 5.50 MiB | 9.51 MiB/s, done.
 Resolving deltas: 100% (8084/8084), done.
 Checking connectivity... done.
The file tree on the left side of Codio should update. You'll see a new "zeroclickinfo-xxxxx" directory (where "xxxxx" is whichever Instant Answer type you chose)
Change into the current directory of the terminal by typing
cd zeroclickinfo-xxxxx, where "xxxxx" is whichever Instant Answer type you chose.To start working on a new change, create a new branch in your repository for this particular project. Make sure to work on a separate branch for each contribution.
Create a new branch by typing
git checkout -b branch_name. You can use any branch name you like. You can switch between branches by usinggit checkout branch_name.
Congrats! You've now cloned the DuckDuckHack code onto your Codio machine. You're now prepared to code your first Instant Answer. Start hacking with one of our walkthroughs.
If this is your first time using Git and GitHub, we've created an overview of how you'll use Git to contribute to DuckDuckHack.
 Have questions about git? Talk to us on Slack